2019年6月30日日曜日

mlkit#901 シンプルに動かす 変更編

Google FireBaseは、凄いスピードで進化している。
サンプルプログラムも、どんどん変わっている。
ただし、どんどん洗礼化されているので、コードを見ることはMlKitを活用する上では
欠かせない。
そして、それをベースに検証もするのだけど、新しい依存するモジュールが動かなくなっていたりと、、、
今回は、ビデオ画像を認識の元データとして使う場合の設定と、
Version Controlのメモ

(1)ビデオ画像を使う

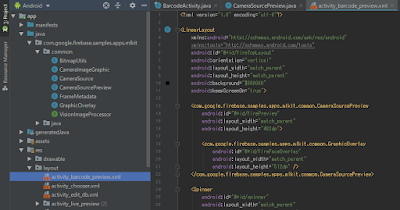
カメラとGraphicのオーバーライト処理が必要になるわけで、
それは、プログラムをガンガンいじるイメージではなく、
カメラとオーバーライトを、Layoutで設定し
IFを使って取得して処理をする感じ。
その全体像が分かる写真がした。僕は、わかる。メモだからいいでしょう(笑)
オッチョコチョイナ僕が時間を使ってしまったのが、
#901が、カメラとオーバーライト処理のモジュールがcommonにまとめられた事に
頭がついていかず、以前の場所を指定したまま処理をしたので、落ちまくり。
プログラムの方ばっかりを見ていたけど、実はレイアウト定義だった。

(2) Version Control

Android Studioにクラスを作るのだけど、階層構造で表示される画面には、
クラスが赤くなったまま。かつクラスを活用することができない。
これも、数時間使ってしました。

File > Setting > Version Control 
あれ? Gitになっている。これをnoneの指定にするとお見事!
 
 Androidのプログラムばっかり作っているわけではなく、
物忘れも早くなり、こんな事を繰り返しながら進んでいます。
#901になって認識速度、むっちゃ早くなった。

で、良いアイデアが下りてきたのだぁ (^^)/

AndroidManifestも今回は、理解できてうれしかったなぁ。
モジュールを沢山作っても、交通整理して使える。
これは楽しいのでした。


追記

(3) Android 9(Pie)のセキュリティ

実は、セキュリティが厳しくなっており、HTTP通信を使う場合には、
セキュリティ設定をしないとならないのだぁ
いろいろなセキュルティ指定の方法があるけど、一番簡単なでも推奨されないやり方で一応、一応、一応の設定。
おまじないは、、、
android:usesCleartextTraffic="true"
Peace!! 

mlkit#901をシンプルに動かすためのメモ

起動までをメモ

1.windows に gitをセットアップ
ダウンロードして、インストール
https://gitforwindows.org/
何故か、画面のdownloadボタンの動きがおかしく、画面左上のバージョンをクリックして、変わった画面から64bit版をダウンロード

2.firebase quickstart-android ダウンロード
上記でセットアップした、Git Bashを使う。
セットアップしたいディレクトリーに移動をしコマンド入力する。
git clone https://github.com/firebase/quickstart-android.git

3.Firebase構成ファイルの追加
ディレクトリーmlkit/appに配置する
Firebaseに登録した時に、DownloadしたJsonファイル

4.Firebase AndroidManifast.
mlkitは、日々変更が加えられている。昨年のmlkit内容とは変わっている。
特に、僕が最初に使った時からは、kotlinのサンプルが追加されており、
起動時の画面でjava、kotlinの選択画面が現れる。


これは不要なので、Manifestを書き換えて、起動画面を変える。
インストール後のAndroidManifest.xml

<?xml version="1.0" encoding="utf-8"?>
<manifest xmlns:android="http://schemas.android.com/apk/res/android"
    package="com.google.firebase.samples.apps.mlkit">

    <uses-permission android:name="android.permission.CAMERA" />
    <uses-permission android:name="android.permission.INTERNET"/>
    <uses-permission android:name="android.permission.WRITE_EXTERNAL_STORAGE" />

    <uses-feature android:name="android.hardware.camera" />
    <uses-feature android:name="android.hardware.camera.autofocus" />

    <application
        android:allowBackup="true"
        android:icon="@drawable/ic_launcher"
        android:label="@string/app_name"
        android:theme="@style/MaterialTheme">
        <meta-data
            android:name="com.google.firebase.ml.vision.DEPENDENCIES"
            android:value="barcode,face,ocr,ica" />

        <activity
            android:name="com.google.firebase.samples.apps.mlkit.java.ChooserActivity"/>

        <activity
            android:name="com.google.firebase.samples.apps.mlkit.kotlin.ChooserActivity"/>

        <activity
            android:name="com.google.firebase.samples.apps.mlkit.EntryChoiceActivity"
            android:exported="true"
            android:label="@string/app_name">
            <intent-filter>
                <action android:name="android.intent.action.MAIN" />
                <category android:name="android.intent.category.LAUNCHER" />
            </intent-filter>
        </activity>

        <activity android:name=".java.LivePreviewActivity" android:exported="true">
        </activity>

        <activity android:name=".kotlin.LivePreviewActivity" android:exported="true"/>

        <activity android:name=".java.StillImageActivity"
            android:exported="true">
        </activity>

        <activity android:name=".kotlin.StillImageActivity"
            android:exported="true"/>
    </application>

</manifest>

変更後のAndroidManifest.xml

<?xml version="1.0" encoding="utf-8"?>
<manifest xmlns:android="http://schemas.android.com/apk/res/android"
    xmlns:tools="http://schemas.android.com/tools"
    package="com.google.firebase.samples.apps.mlkit">

    <uses-permission android:name="android.permission.CAMERA" />
    <uses-permission android:name="android.permission.INTERNET"/>
    <uses-permission android:name="android.permission.WRITE_EXTERNAL_STORAGE" />

    <uses-feature android:name="android.hardware.camera" />
    <uses-feature android:name="android.hardware.camera.autofocus" />

    <application
        android:allowBackup="true"
        android:icon="@drawable/ic_launcher"
        android:label="@string/app_name"
        android:theme="@style/MaterialTheme"
        tools:ignore="GoogleAppIndexingWarning">
        <meta-data
            android:name="com.google.firebase.ml.vision.DEPENDENCIES"
            android:value="barcode,face,ocr,ica" />

        <activity
            android:name="com.google.firebase.samples.apps.mlkit.java.ChooserActivity"
            android:exported="true"
            android:label="@string/app_name">
            <intent-filter>
                <action android:name="android.intent.action.MAIN" />
                <category android:name="android.intent.category.LAUNCHER" />
            </intent-filter>
        </activity>

        <activity
            android:name=".java.LivePreviewActivity"
            android:exported="true" />

        <activity android:name=".java.StillImageActivity"
            android:exported="true">
        </activity>

    </application>

</manifest>

あとは、ソースを眺めて確認、確認

Peace!!


2019年6月4日火曜日

mysqlのバックアップメモ

忘備録

1. backupシェル

#!/bin/sh
# Set mask for other user cann't read
umask 077

# backup file
# Retention period
period=31

# directory for backup files
dirpath='/home/pi/backup/mysql'

# backup file naming
filename=`date +%y%m%d`

# excute
mysqldump --opt --all-databases --events --default-character-set=binary -u root --password=xxxxxxxxx | gzip > $dirpath/$filename.sql.gz

# delete old backup files
oldfile=`date --date "$period days ago" +%y%m%d`
rm -f $dirpath/$oldfile.sql.gz

2. sudo  crontab -l

0 2 * * *  /home/pi/prj/sql/mysql_backup.sh > /tmp/cron-bk.stdout 2 > /tmp/cron-bk.stderr || [ $? -eq 1 ]

3. WIndowsマシンへのバックアップ

Peace!!

cron 設定の悲劇

cron使って、mysqlのデータバックアップを行う設定をしたのだけど、、、

ネット情報をまともに信じてしまい半日無駄にしたというアルアル

ネットでは、コマンドの前に "root"が入っていた。
何も考えすに、そのまま転記し起動時間だけ変更
手動では動くshellが、errorになる

結局、crontabの書式のように 起動時間設定の後は

コマンド

コマンド

です。

起動ユーザなんて入れてはいけない

他の機種とOSの場合は解らないが
Raspberry Piと、Stretchは コマンド

Peace!!

2019年6月2日日曜日

mysqlでインポートしたDBのユーザのパスワード再設定

mysql + raspberry pi で、業務システム開発中

当然バックアップとりますが、それを開発用のマシンにインポートのメモ

mysql -uroot -prルートのパスワード  < 190530.sql

開発用のユーザ(xxx)でログインできない

$ mariadb -uthn -p
Enter password:
ERROR 1045 (28000): Access denied for user 'xxx'@'localhost' (using password: YES)

$mariadb -uroot -p

update mysql.user set password=PASSWORD('1234567') where user='xxx';

ただ、上記の処理をしてもダメな時があり、、、

MariaDB [(none)]> flush privileges;
MariaDB [(none)]> show grants;
+----------------------------------------------------------------------------------------------------------------------------------------+
| Grants for root@localhost                                                                                                              |
+----------------------------------------------------------------------------------------------------------------------------------------+
| GRANT ALL PRIVILEGES ON *.* TO 'root'@'localhost' IDENTIFIED BY PASSWORD '*8637AD513CC7ED5F46D72CD7C3C587CFC9522613' WITH GRANT OPTION |
| GRANT PROXY ON ''@'%' TO 'root'@'localhost' WITH GRANT OPTION                                                                          |

+----------------------------------------------------------------------------------------------------------------------------------------+

あれ?
MariaDB [(none)]> grant all privileges on *.* to 'thn'@'localhost';
MariaDB [(none)]> flush privileges;

OK

Peace!!